- Makeexpand_more
- radio_button_uncheckedBeta(1)
- radio_button_uncheckedGas Gas(21)
- radio_button_uncheckedHonda(11)
- radio_button_uncheckedHusqvarna(26)
- radio_button_uncheckedKawasaki(5)
- radio_button_uncheckedKTM(27)
- radio_button_uncheckedSuzuki(3)
- radio_button_uncheckedYamaha(7)
- Priceexpand_less
- min$0
- max$1,650
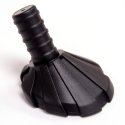
High-impact black foot for use with square Trail Tech kickstand leg
Note:
Part number 5925-foot (Black) only fits the square Trail Tech kickstands
1. With the kickstand arm mounted to the motorcycle hold the replacement foot near the insertion hole and note rotation to allow the foot to lay flat on the ground once installed.
2. Remove the kickstand arm from bike
3. Remove old foot. This is usually accomplished by putting the foot in a vise and inserting a long screw driver or arm in the pivot bolt mounting hole and twisting it loose while pulling. To ease removal of the foot heat can be applied to the leg with a heat gun.
4. Clean and remove all oils and residue form the new foot and the kickstand foot hole
5. Use threadlocker (Surlok 1270) on the entire ribbed area that fits into the kickstand cavity to glue the foot in place
6. To insert the foot we recommend using a press. Other methods can be used. Make sure the rotation is correct and push the foot into place until it is fully bottomed against the lower flange. IMPORTANT: ALWAYS USE EYE PROTECTION WHEN USING A PRESS OR HAMMER OPERATION.
7. Wipe clean all remaining loctite
8. Remount arm to bike and insure the rotation of the foot is correct. If not use a soft jaw vice to hold the foot and twist it to the correct rotation.
9. Allow 24 hours before use of the kickstand.
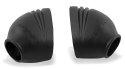
Acerbis footpeg covers prevent mud and debris from packing into the footpeg pivots/springs, ensuring that the peg always returns to a horizontal position. Used by multiple factory MX and off-road teams.

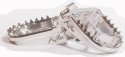
Extra-Wide: Better Control of the Bike - 60mm
Easily Replaceable Stainless Steel Blades
Maximum Grip
Maximum Lightweight.
Extra-Wide: Better Control of the Bike - 60mm
Easily Replaceable Stainless Steel Blades
Maximum Grip
Maximum Lightweight.
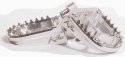
Extra-Wide: Better Control of the Bike - 60mm
Easily Replaceable Stainless Steel Blades
Maximum Grip
Maximum Lightweight.

Extra-Wide: Better Control of the Bike - 60mm
Easily Replaceable Stainless Steel Blades
Maximum Grip
Maximum Lightweight.
